
In my adventures in Twitterland I’ve noticed a lot of people who are using WordPress blogs (this one included). Some use wordpress.com which gives them a free blog with minimal theme and plugin choices; however, they get a lot of cool optimizations built in.
If you’re like me and running your own self-hosted blog then you have all the options in the world available to you but far less right out of the box.
This post will go over the performance changes I’ve made in an attempt to get my blog up to speed. It is part one of a series called Optimizing WordPress which will cover performance, syndication, editing, and more.
For now, let’s drop a gear and disappear speed up our blogs!
WordPress – Location, Location, Location
The first major point of consideration is this: Are you master of your own fate, beholden to no one, or a slave to the will of others? And by that of course I mean: do you have root?
 I wholeheartedly recommend having root privileges if you are going to run your own blog (particularly if you know what you are doing). Shared hosting of the bygone age generally did not allow this, but today you can get yourself setup via a number of dedicated or cloud virtual private server (VPS) environments and have your own fully configurable server in no time flat. I personally host mine with 15 Minute Servers as I want a robust environment I can use for many of my own sites, shared hosting for friends, etc.
Some providers are actually dedicated strictly to WordPress such as the ever popular WP Engine. These options will cost a bit more than running it yourself, but they also come complete with the enhancements you will probably want.
Whatever you choose to do, get root privileges. Not only will it make you feel lordly, but it will be necessary for the next step of this article.
Let’s Get Cached
There’s a piece of software out there that does such a good job at providing caching services to PHP that PHP will include it in the core sometime soon. Until then, I’d recommend you download Alternative PHP Cache (APC).
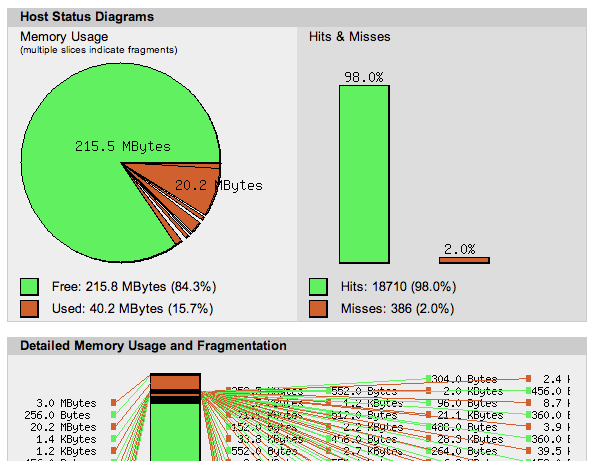 With APC installed PHP code can now take direct advantage of the RAM resources on your system and use it for caching chunks of data. MySQL results, objects, and even entire HTML pages can be cached inside of it with the right code.
Alone this cache won’t do much for you, but with the right plugins for WordPress you’ll be able to take full advantage of it. Before that point though we must get the APC software installed. You can find a good guide for that here.
And as if the software benefits weren’t enough, you also get a great monitoring page with all sorts of metrics to keep track of which I know my Oracle buddies will absolutely love.
Cold Pressed Performance
Once you have APC installed, you can go ahead and install a plugin in WordPress called W3 Total Cache. This is an extremely well known plugin that is able to cache various parts of the WordPress environment, including:
- Pages – When a user reads a page it will be cached so the next hit will be near instant.
- Minify – There are two parts to this component. It will take your JavaScript/CSS files and eliminate whitespace and change variable names to be smaller. It will also cache these ‘minified’ files for better performance.
- Database – Caches MySQL query results. Highly important for WordPress, where depending on your theme you may be running over 100 queries for a single page.
- Objects – Caches WordPress cache objects into your chosen cache (in our case, APC).
- Browser – Allows browser-based caching on the client side.
Turning these on is as simple as installing W3 Total Cache, navigating to the Performance > General Settings page, and selecting these caches with the Cache Methods set to “Opcode: Alternative PHP Cache (APC)”. There are other settings that may interest you which you can find under each cache type’s individual page under the Performance section of your admin page. One incredibly interesting option is the CDN, which stands for Content Delivery Network.
It’s not Delivery, It’s CDN
Content Delivery Networks are the coolest thing since ever. Simply by setting up a CDN with a “pull zone” and fiddling with some DNS settings you can put the power of many servers at your disposal.
CDNs are designed to take your static content such as images, CSS files, and JS files and distribute them over a wide network. This distribution is designed to be automatic both for you and your end user. Viewers on your website see nothing but sudden blazing fast speeds as the images and code for your pages are delivered to their browser from a variety of sources.
There are many CDNs to choose from. CloudFlare is an extremely popular one due to its performance and security features while also being somewhat easy to set up. I went with MaxCDN due to reviews I had read and the customizability it seemed to offer and I am very happy with it. Setup can be a little harrowing; basically you need to create an account, fork over some cache, and add CNAME records on your DNS pointing a subdomain to your new MaxCDN account. On the MaxCDN side, you will configure a Pull Zone which is configured to pull content from your blog on request and serve it up. There are options to clear cache files and all sorts of cool reports and other features.
There are a ton of settings to use and they are well documented. Instead of going through the entire thing I will point you to How To Install and Setup W3 Total Cache For Beginners. Just remember that we are using APC for caching, not Disk. The most important part of the article at this point is the MaxCDN and W3 setup for it.
Once you have Page, MySQL, Object, and Browser caching enabled along with a CDN to serve up your images, JavaScript, and CSS from all over the world you will be, for the most part, as fast as a software company jumping on the Cloud bandwagon.
One item of note: There’s a setting under Performance > Page Cache to enable/disable the cache for either logged in users or certain user roles. It is highly recommended that you turn off page caching for Administrators. That way you can see the results of your hard won changes. The only drawback is that your users will have faster performance than you, and may notice problems that you don’t. It’s always a good idea to have another browser ready that’s not logged in to your admin account to keep track of pages and how they look.
What’s Slowing You Down?
Even with all these optimizations you still may have some pain points. A lot of times these are caused by plugins that are simply too overbearing on user performance. Many plugins have components that ‘phone home’ to the plugin owner’s site for whatever reason which can drastically reduce your performance.
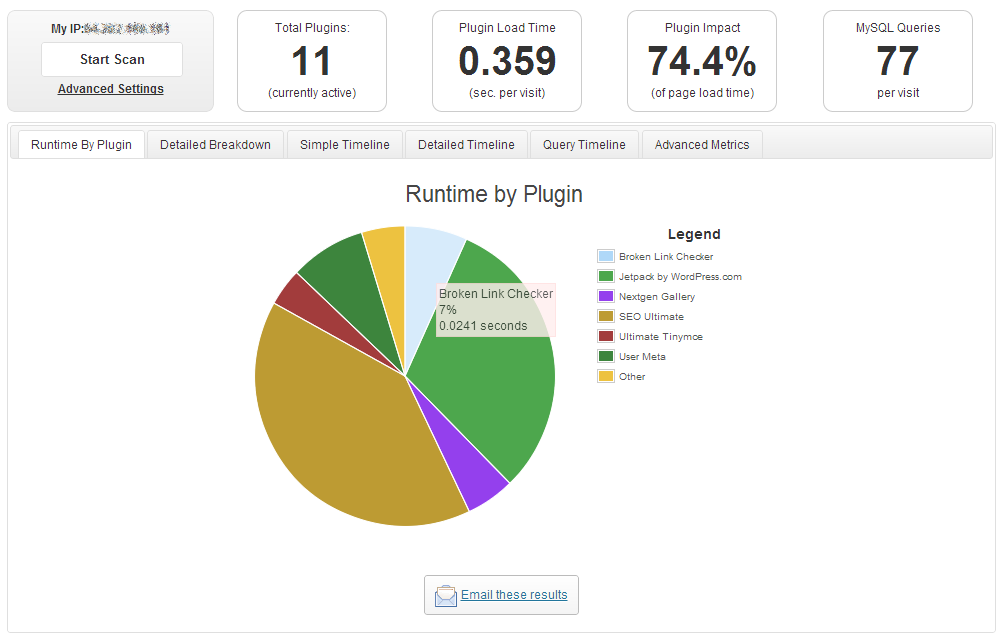 The plugin P3 (Plugin Performance Profiler) is able to review your site and give you great details on which plugins are causing the most pain. You can find the plugin here.
Once you’ve installed the plugin, direct it to the pages you’d like to test and let it go to work. It takes a while but gives you table and graph data to let you know what you need to disable, replace, or tweak.
Honestly the best policy overall is to review your plugins periodically. Many times you’ll find that there are a ton of plugins you just don’t need, or maybe stopped needing recently.
Testing, Testing 1ms 2ms 3ms
While you’re doing all these performance improvements it’s a good idea to keep an eye on your page speeds to track your progress. Pingdom Tools has a great speed test that can test your site from multiple locations and let you know how long it took. You also get a breakdown of where the performance hogs were so you know what to tune next (for instance, a large javascript file or big image). Just because you cache and distribute content doesn’t mean you will be fast for all users; remember, they still have to download the page which takes time. The more jQuery and reactive design stuff you have on your page, the bigger it is going to be.
Another good one is WebPageTest which I actually like quite a bit better than Pingdom. It gives you greater options for how you want the test conducted and can save the results so you can compare later. However, both are capable and can give you great clues as to which files are causing you grief.
What Else?
That’s the end of this performance boosting article, but there is more to come. Next in my Optimizing WordPress series is syndication, where I will go over different syndication and sharing plugins and technologies available to you to help get your blog to more places.
Nice! Google Analytics can also help track response time for your pages.
Bloody marvellous post chap!
Like you I’ve been hosting my own WP blog for a number of years and have learnt the optimization tricks of the trade the hard way over time.
Great to see that our configurations are near identical (except I’m using WP Super Cache) which I hope means we’re both on the right track, rather than idiots together 😉
The unfamiliar reader will perhaps not appreciate just how much value/experience you’ve packed into this one post here. Good stuff!
Jeff and John, thank you both!
John, how do you like WP Super Cache? The thing I like about W3 is that it covers my minifier, all caches, and CDN configuration at once. I’ll have to look into Super Cache.
Thank you again!
very good topic, I’m glad to have fallen over. A quality item. Thank you.
You can also refer http://www.techflirt.com/blog/wordpres/wordpress-performance-tuning.html