
Let’s face it: education without interaction is about as effective as shouting origami instructions at a lumberjack who is cutting down trees. Sure, your informative lessons will come in handy when the product of their work finally becomes paper, but it will be long forgotten and ultimately worthless by then. The only way a student is going to learn is if they can put their hands on what you’re teaching, walk the journey with you, and attach a positive interactive experience to the lesson.
Some time ago I was trying to solve this interaction problem. As Director of the Customer Education team at Delphix, I wanted to provide an interactive experience during classroom training that:
- gives each student their own full lab stack
- makes labs available worldwide
- is easy to create, manage, and tear down
- can be built upon over time
- is intuitive for learners to access and perform their labs
- is cost effective
I couldn’t find a product that did all of these things in the way I needed; and so, I decided to build my own. It started as a python command line package and evolved into a web application and a huge suite of features. In this post, I’d like to provide an introduction to the LabAlchemy application, its overall features, and how it is used. I’ll be going over the tools used to build it in detail in later posts.
Introducing LabAlchemy – Classroom Management in the Amazon Web Services (AWS) Cloud
In order to fulfill bullets #1-4 above, it was clear the platform would need to be built in the cloud. Gone are the days of empty rooms full of servers that students will VNC into, or even using your own laptop as your test bed. These things worked well, but they’re not intuitive and difficult for everyone to work with. It is absolutely critical that your solution be intuitive for the learner, so they don’t fall down a rabbit hole trying to get into the labs in the first place.
And so, I decided to build the platform on top of Amazon Web Services, a rugged and incredibly diverse set of services for building the equivalent of your own datacenters in the cloud. LabAlchemy itself is composed of:
- The LabAlchemy central server that hosts the command line interface (written in python), configuration files (in YAML), web application (written in node.js), metadata repository (in mongoDB), and classroom routing (nginx, more on this later)
- Amazon Machine Images (AMIs) for our various classroom components like Delphix Engines, source and target servers (Linux and Windows), and the ever important “jumpbox” (more on this later too)
- An automated set of Virtual Private Clouds (VPC), subnets, security groups, EC2 instances, EBS volumes, and copious amounts of tags to keep everything tidy and well orchestrated.
In summary, what LabAlchemy gives us is this: classroom labs on demand, at the push of a button. Each lab can have a number of students, each student gets their very own lab server and a complete Delphix stack to perform their labs. Labs are spun up in Amazon cloud, segregated into their own VPCs for easy network management, and can be stopped, started, and terminated at will.
LabAlchemy in Action
Creating labs can be done using the Command Line Interface (CLI) or web application. Let’s look at the web app. It’s more fun.
Choosing a Classroom Type
There are a few things going on behind the scenes here; most notably logging in, which is done with SSO for Delphix employees. 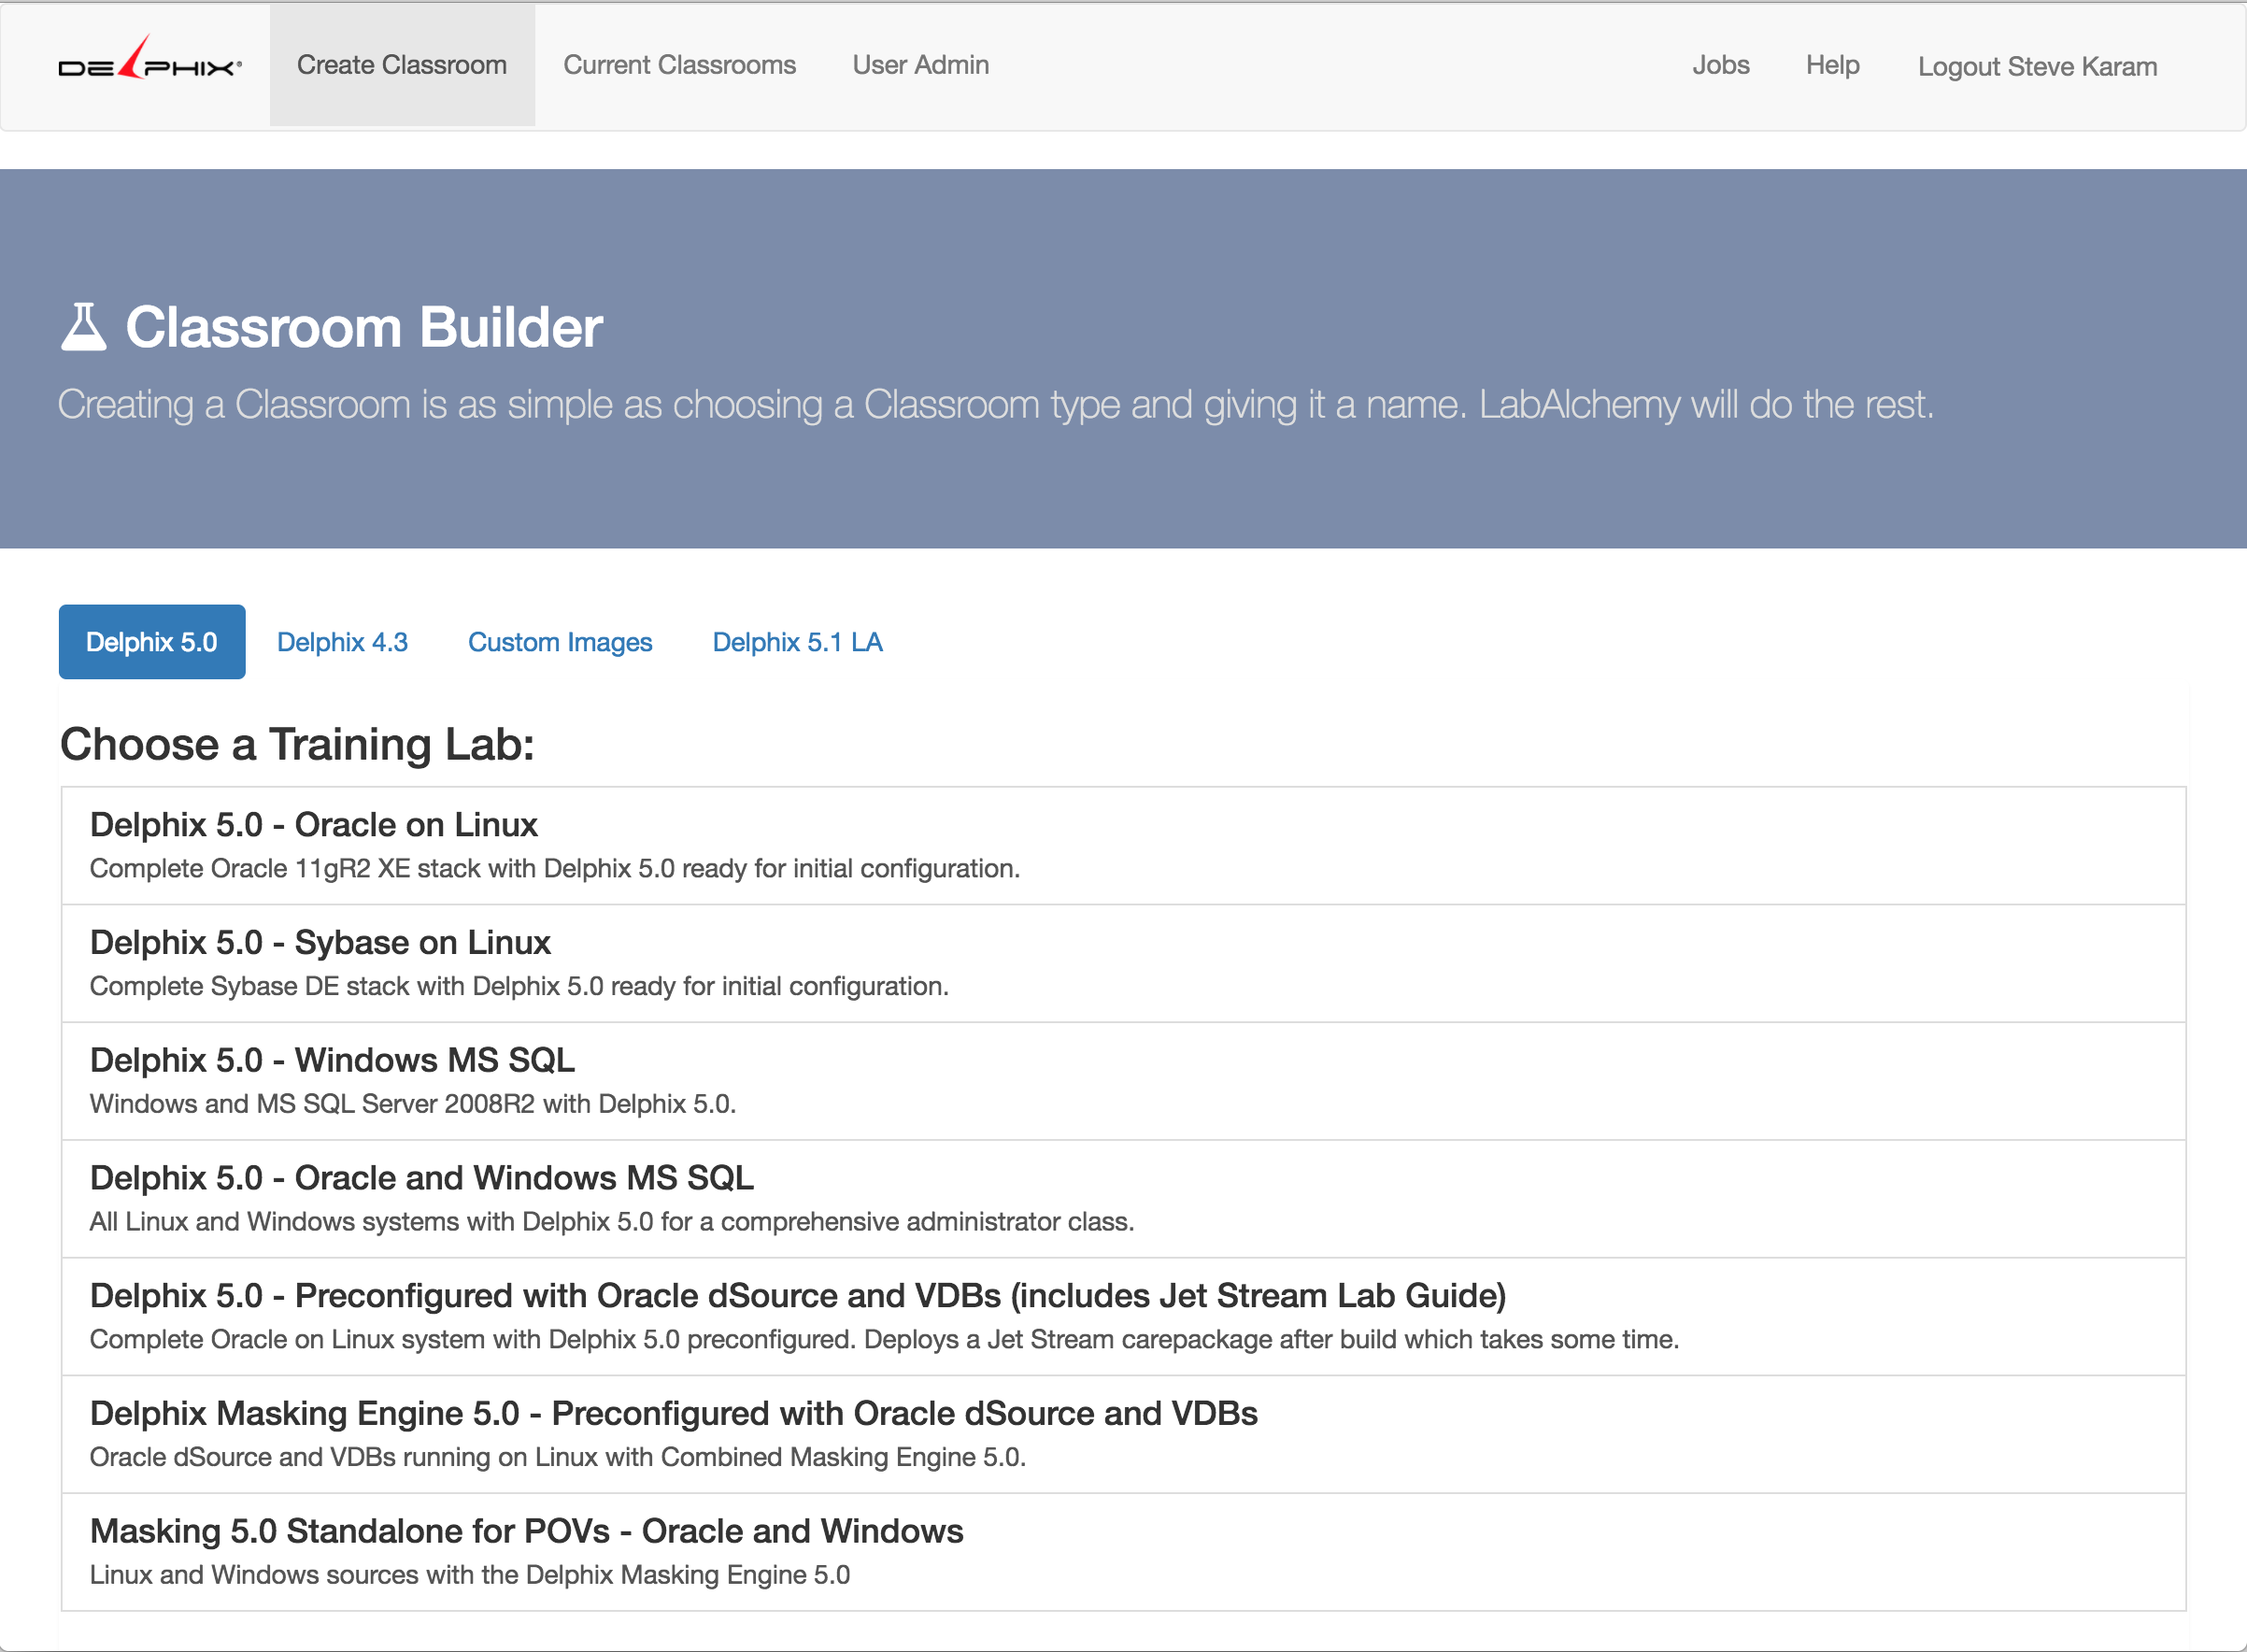 Once a user is logged in and given permissions by my team, they are able to spin up lab environments. The first step is for them to choose a classroom type.
These classroom types are defined in a YAML file that bundles different AMIs into pre-created classrooms. All of the details about each classroom type you see on this screen are baked into the YAML file. As you can see here, we have classrooms with different versions of Delphix (laid out as tabs across the top) and different configurations like Oracle, MSSQL Server, Sybase, etc.
Class Details
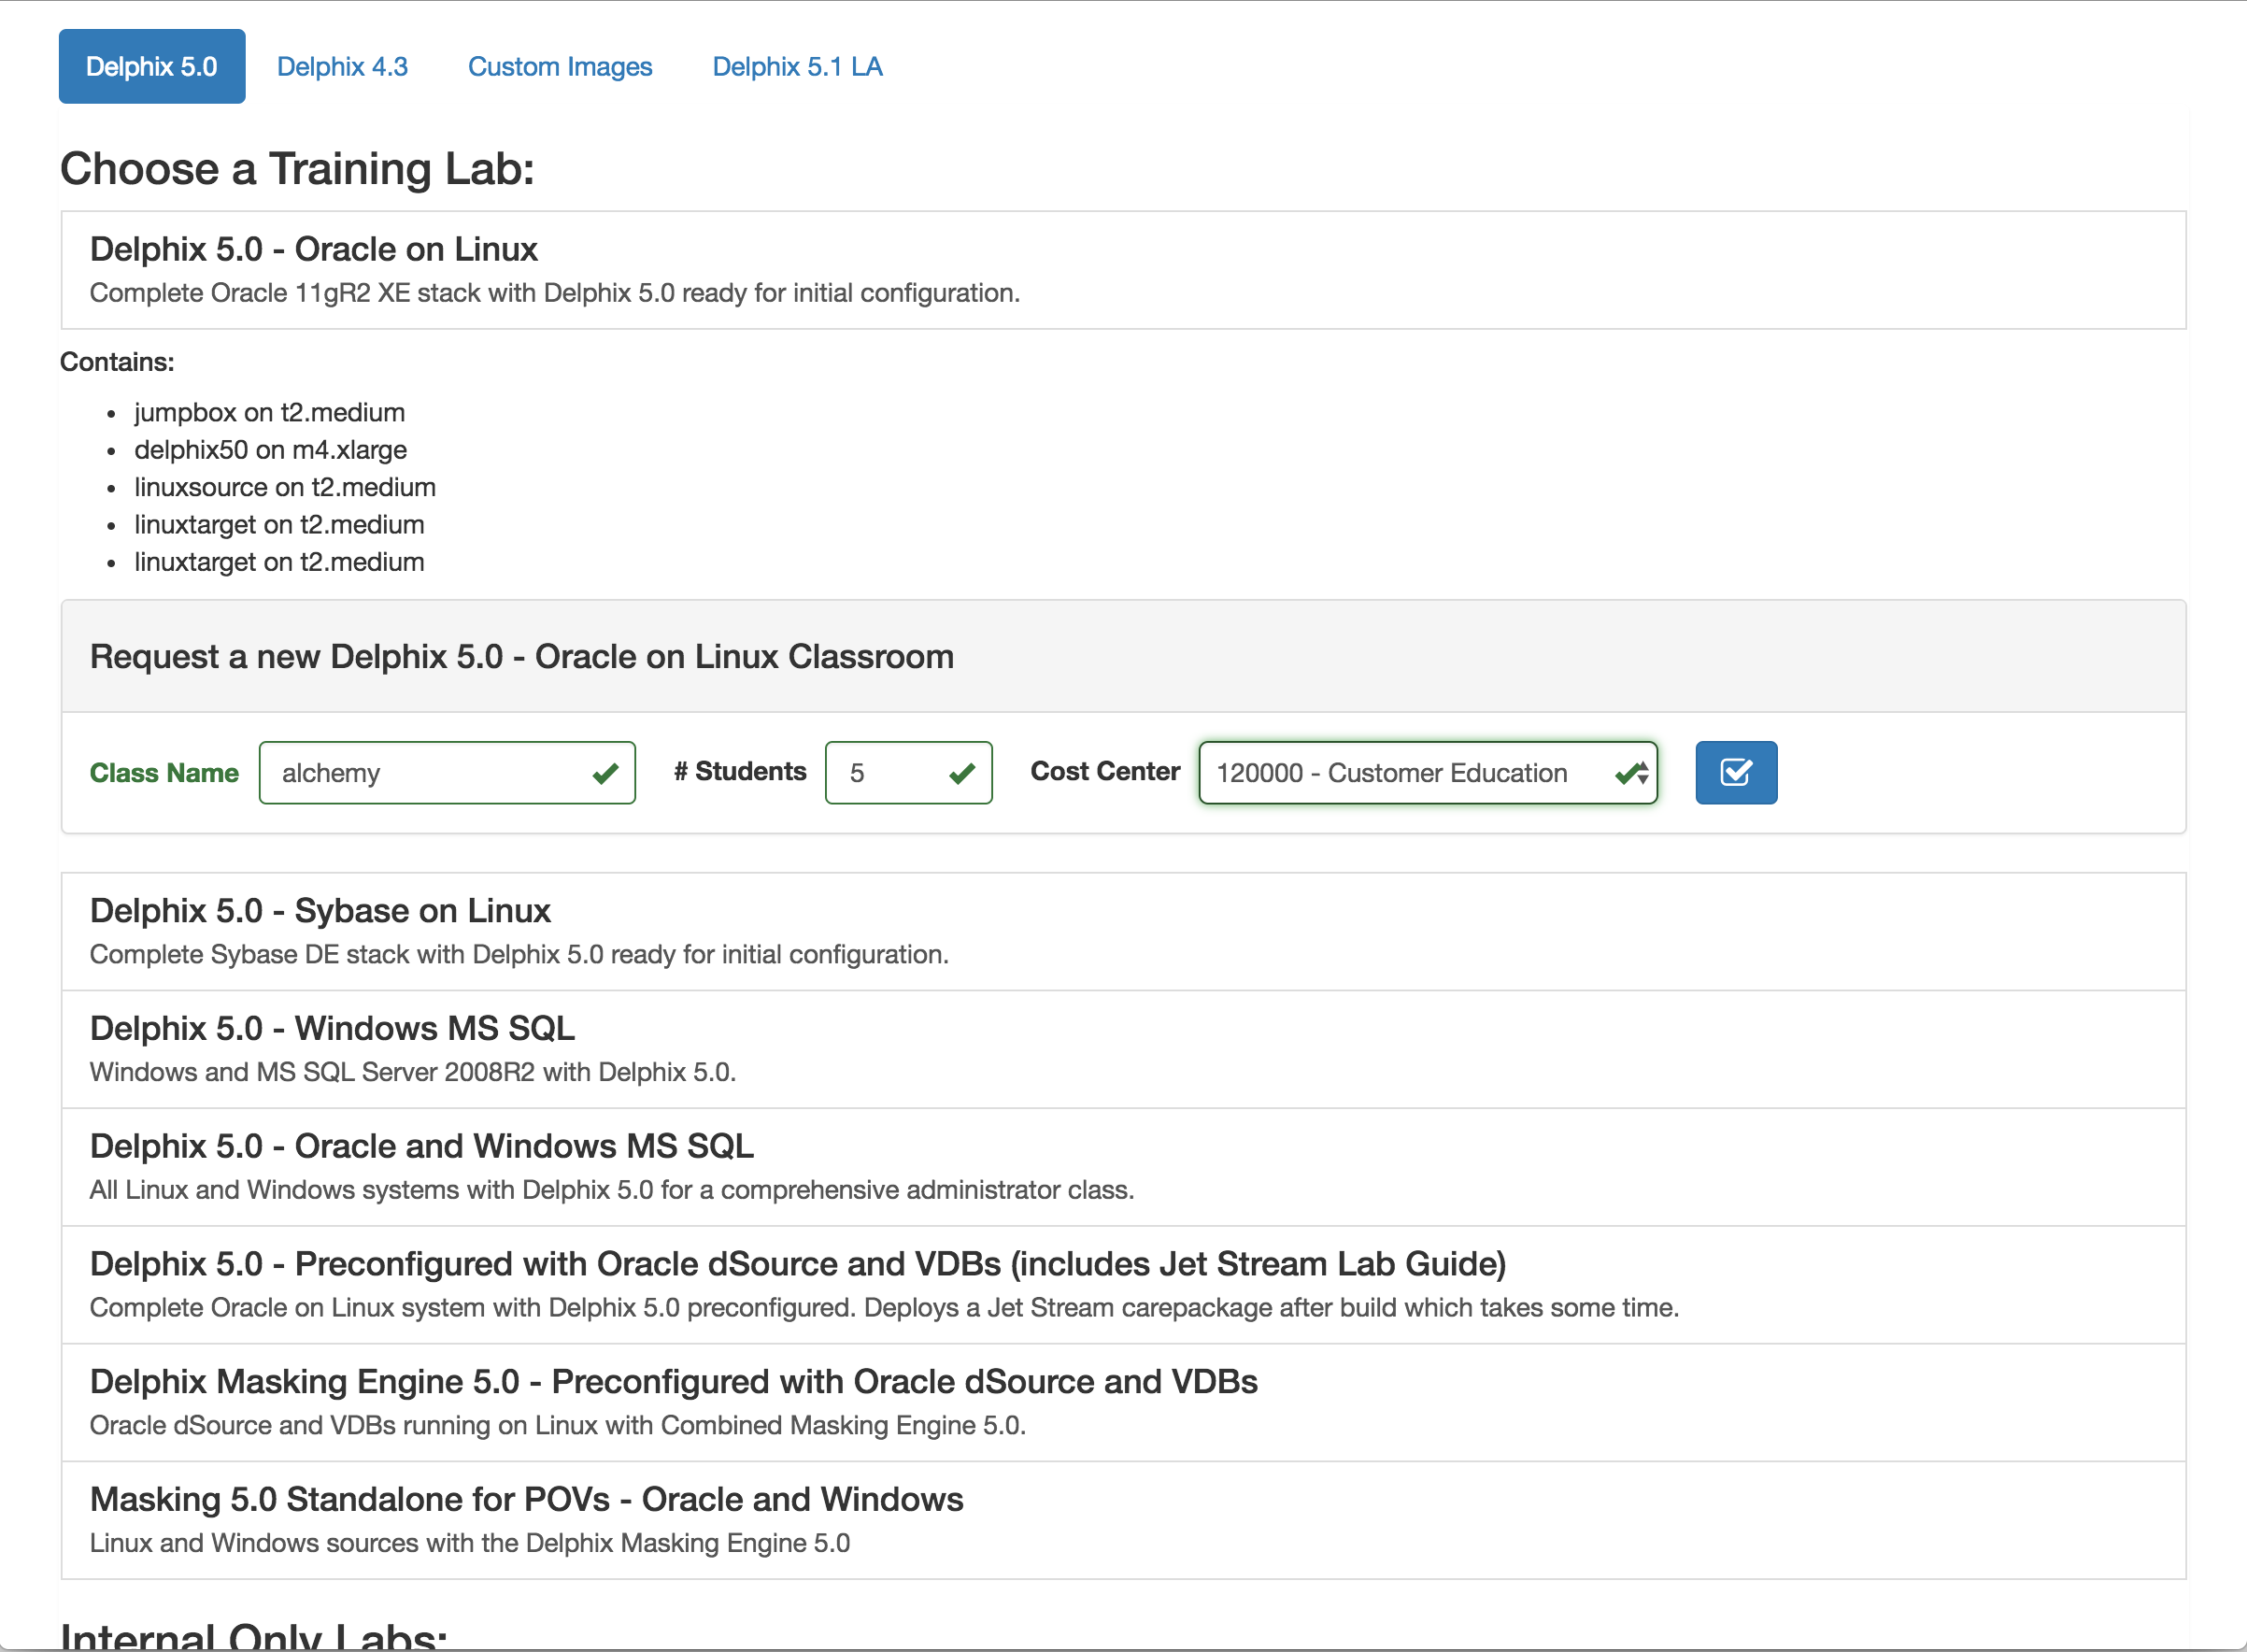 Once you’ve picked a classroom type you have to enter details about the class including: classroom name, number of students, and cost center (for internal accounting). Once the details are entered and confirmed, the job can be submitted.
Class Creation
Once the job is submitted, LabAlchemy allows you to quickly view the job log. Here is a sample job log, showing this classroom being spun up for 5 students in the “alchemy” classroom. As you can see, LabAlchemy automates: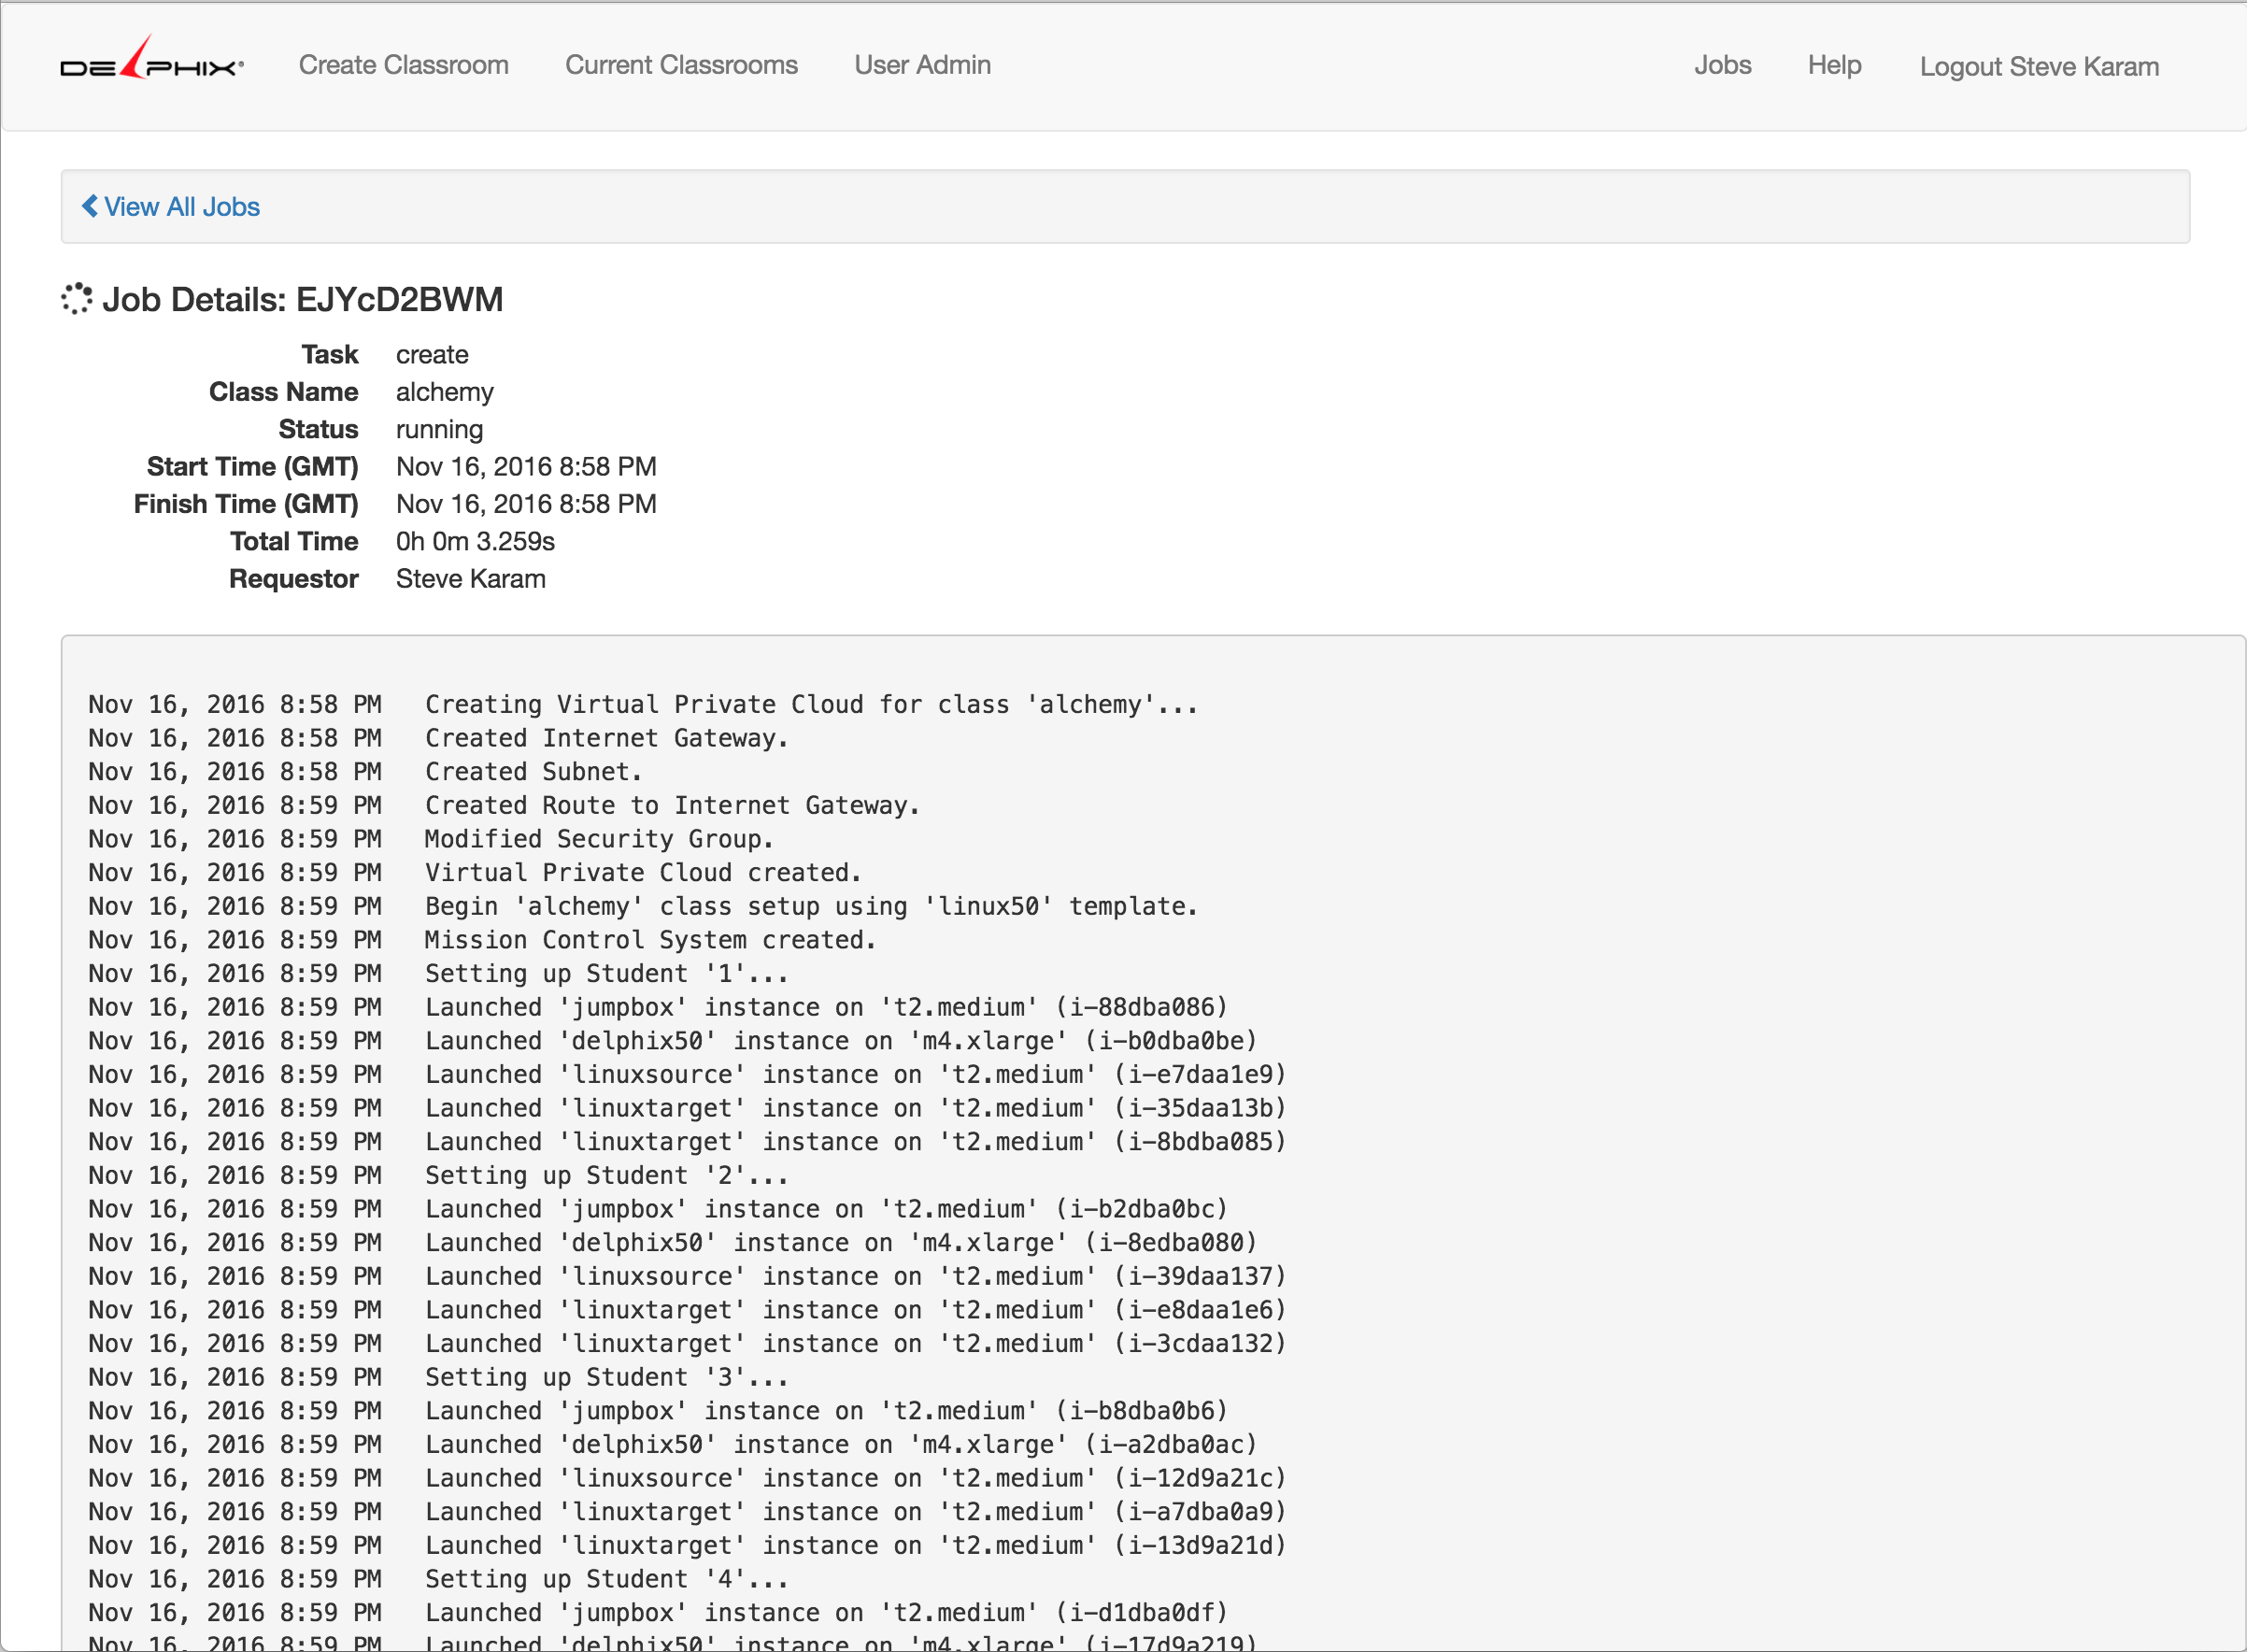
- Configuration of a VPC for the classroom
- Subnet setup
- Internet Gateway setup
- Servers for each student based on the AMI specifications
The log is updated in real time using a feature called WebSockets. We’ll cover that in a future post. Once the log is complete, LabAlchemy waits for the instances to come online, executes any final steps, and deems the classroom setup finished.
Viewing/Managing the Classroom
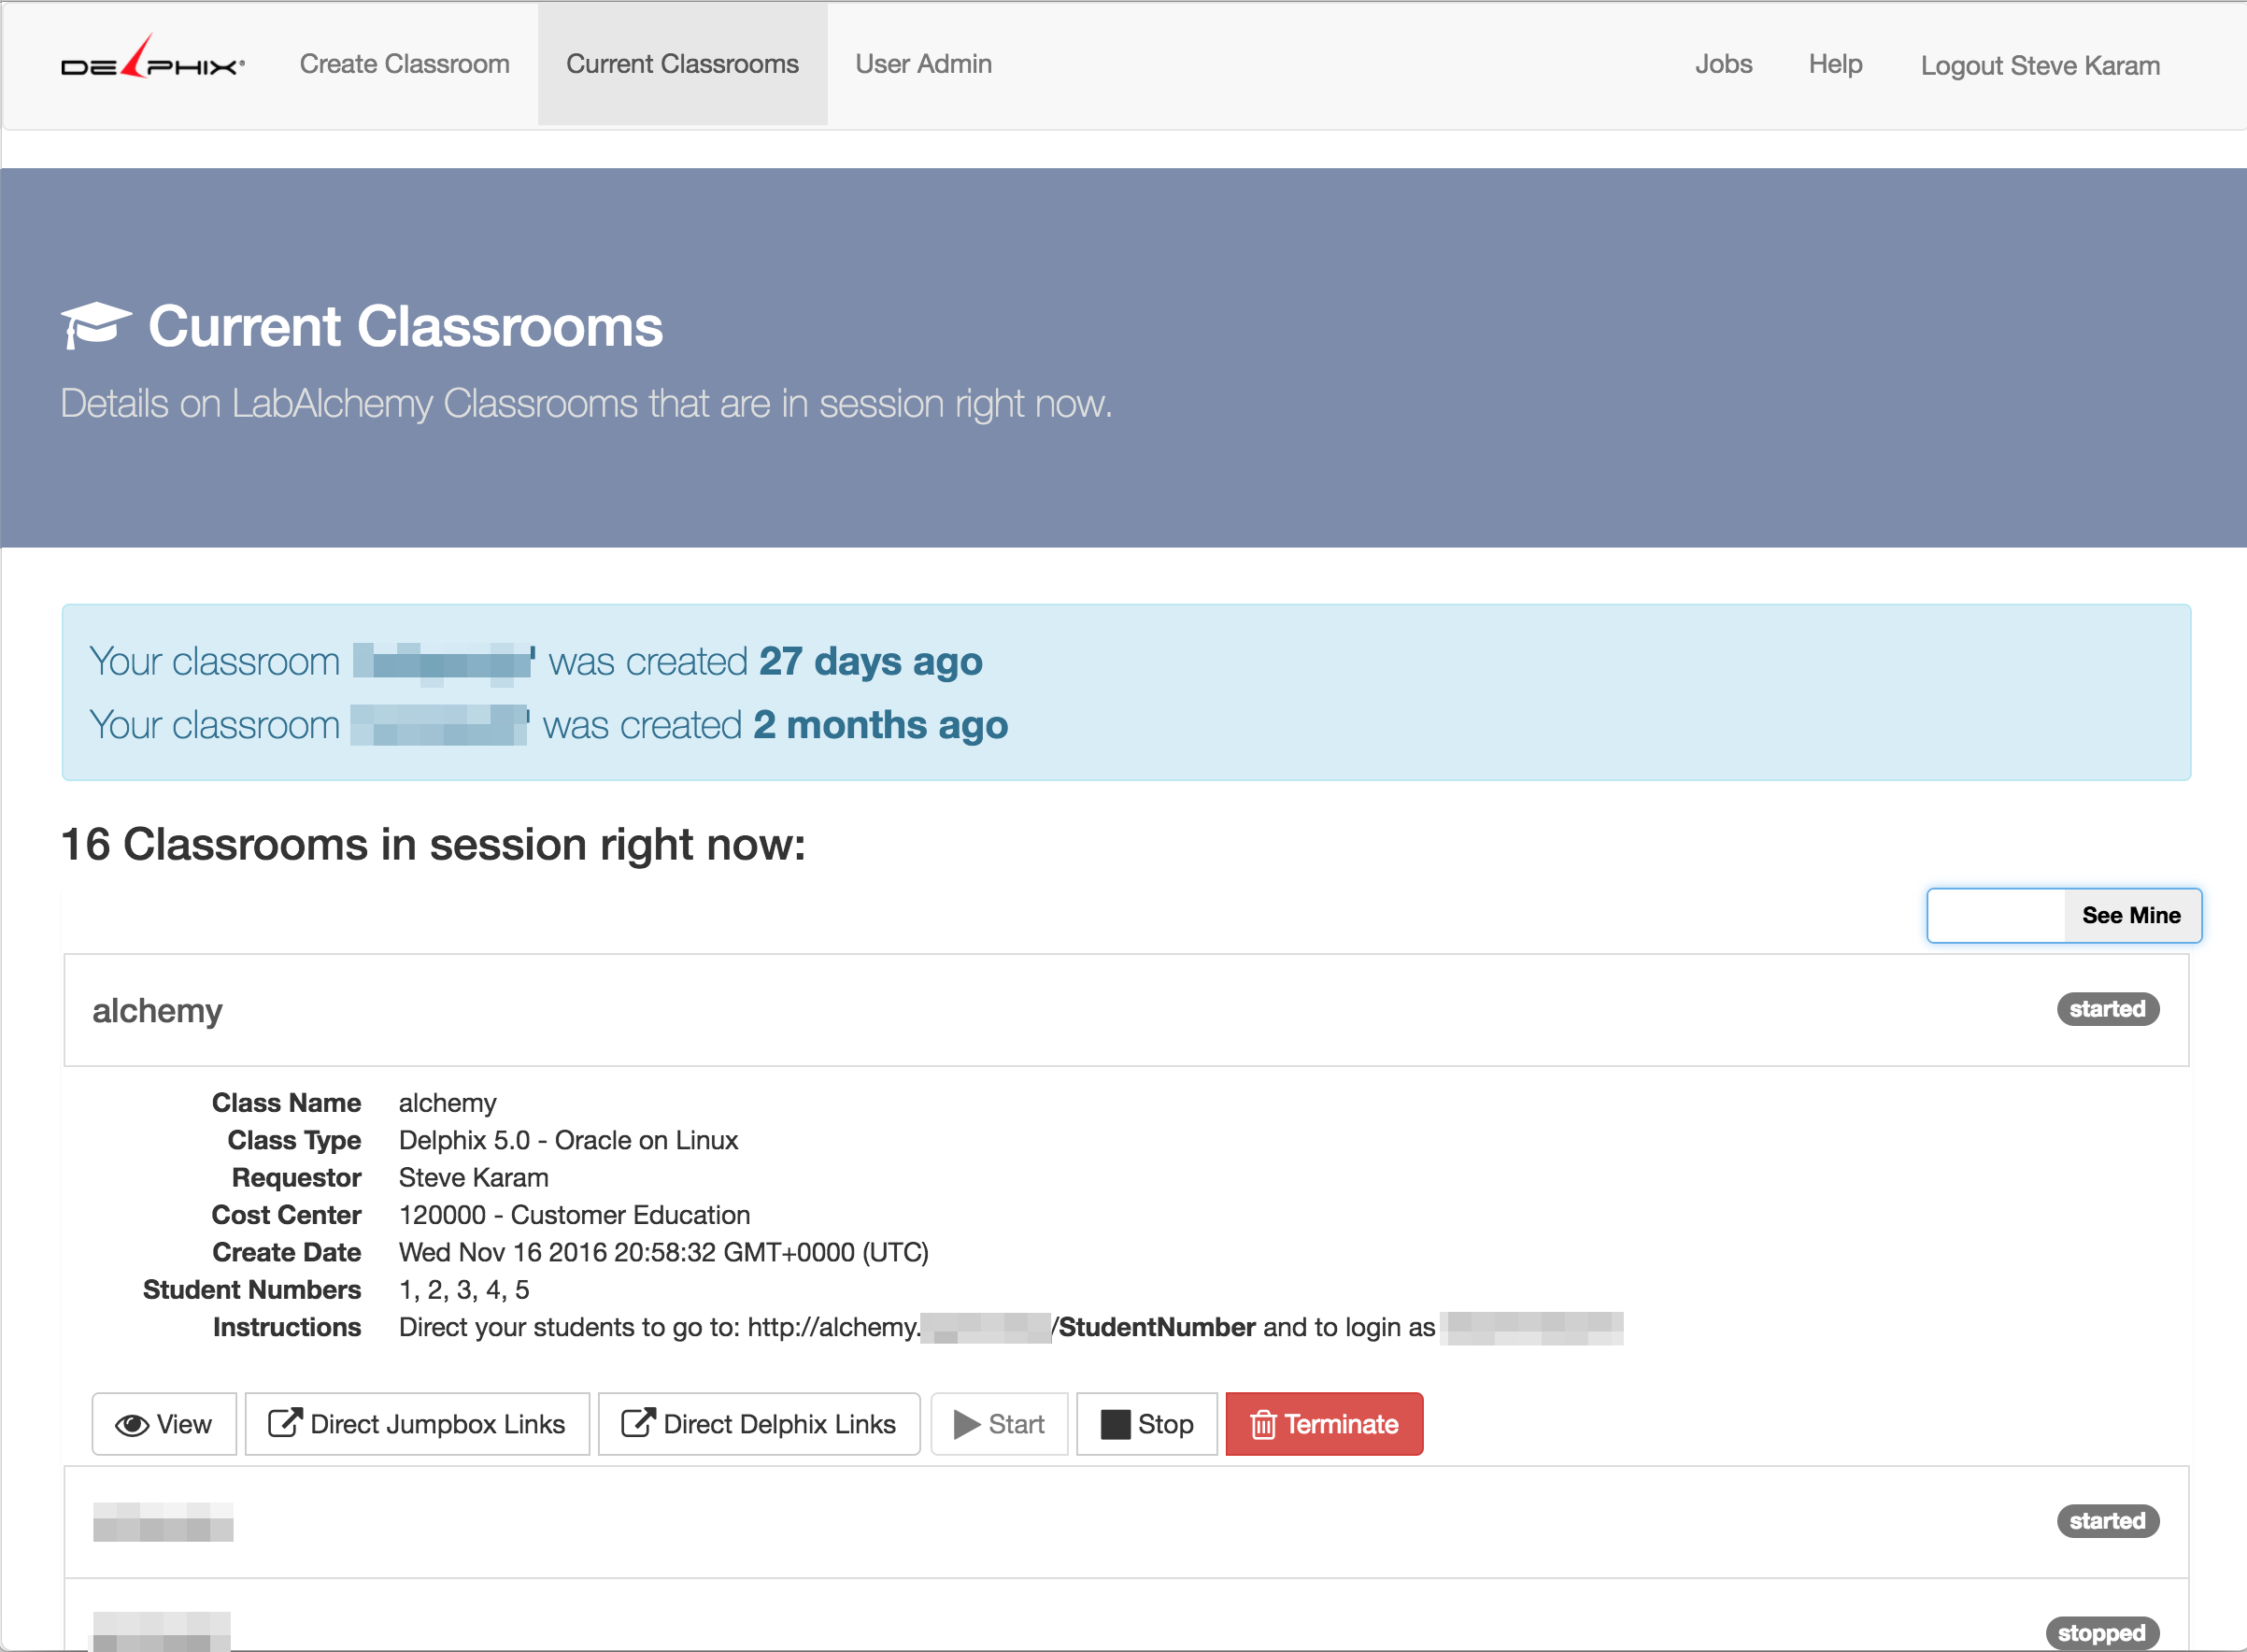 Once a classroom has been created, you can manage it from the “Current Classrooms” page. I’ve set it up to only show my classrooms (3 out of 16 total right now). Each classroom is displayed with a small status box to the right showing whether it is started, stopped, creating, etc. The “alchemy” classroom details are displayed here. There are also a number of options for the administrator:
- View – Snapshots of each student’s lab server are taken once a minute so instructors can monitor usage and progress
- Direct Jumpbox Links – Easy access by IP address to student desktops (more in a moment)
- Direct Delphix Links – Easy access by IP address to Delphix Engines in each student lab environment to use if the student desktop is not sufficient
- Start/Stop/Terminate – Controls to stop, start, or terminate the servers in AWS, providing cost savings when labs are stopped, and easy self-service controls.
Accessing Labs
Now we can finally get to the fun part: accessing the labs! 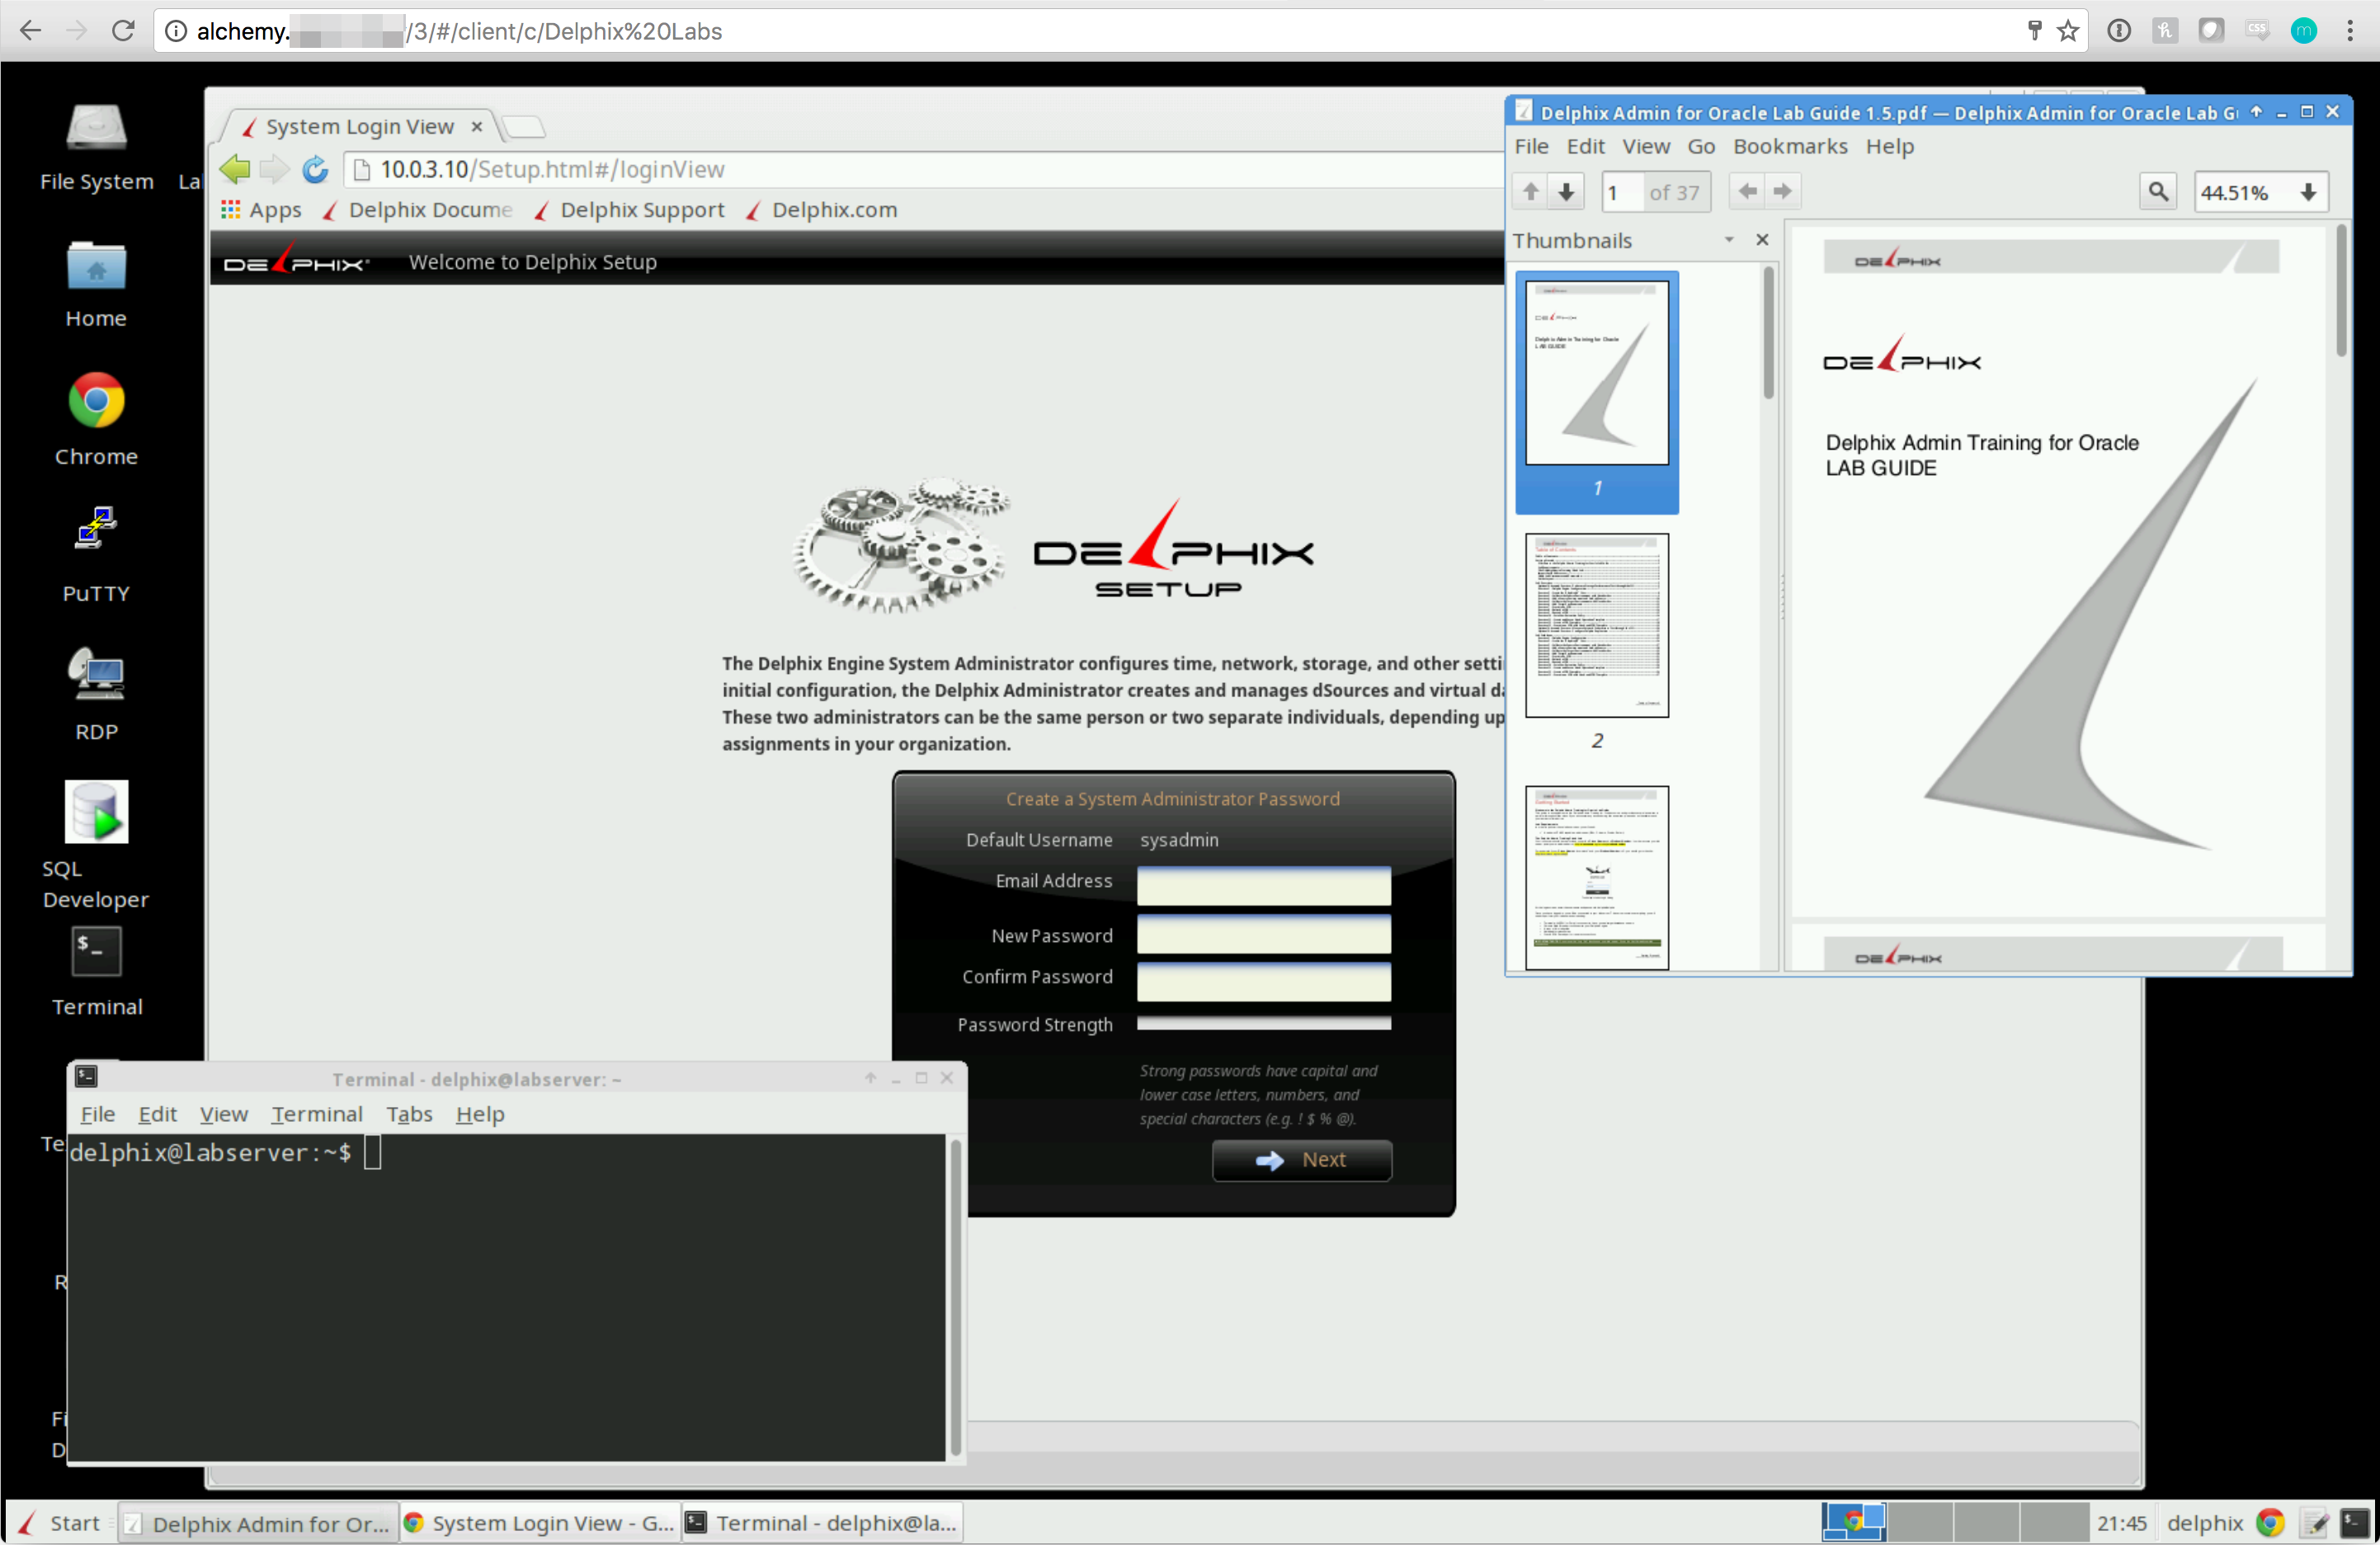 Again, it’s very important to provide a clean and intuitive interface for your learners. To that end, I decided to design the idea of a student lab desktop, or jumpbox. This server is a Linux system running Ubuntu and xfce4 and a theme that more or less looks like Windows. It includes Chrome, terminal, putty, SQL Developer, Remmina RDP client, and a number of other tools to help students complete their work.
The best part though, is how they’re accessed. On the backend, LabAlchemy configures an nginx reverse proxy, which basically forwards their connection on based on a URL scheme. In this case, the scheme is http://classname.labalchemyhost.com/studentnum, where “classname” is the classroom name given on creation, “studentnum” is the student’s number (assigned after creation), and “labalchemyhost.com” is the [redacted] hostname for LabAlchemy itself. You simply go to that URL in your browser, enter the username and password provided by the instructor, and the whole lab server is available to you via HTML5 in your browser. No Flash, no plugins, just easy VNC over HTML5. For example, you can see the desktop for Student #3 in this section.
I didn’t invent this capability. I’m using an amazing open source software package called guacamole, which allows for VNC, RDP, or SSH over HTML5 with a wonderful set of additional features. In LabAlchemy, I orchestrated the configuration of guacamole for all jumpboxes, and provide access to it over the nginx reverse proxy using WebSockets. What you see is the result: a fully functional desktop in your web browser.
Neat! What Else?
As you can see from the previous section, the goal was to make it easy to access these labs. No specific software requirements (like a VNC client), no complex changing IP address to take down. Just a browser and a standardized URL. But I also took that kind of ease of use functionality a bit further with some additional features:
- Guacamole allows connection sharing. This means that more than one person can be on a desktop at a time. In a classroom setting, that allows for students to work on labs, and other students or an instructor to help them out if needed.
- All servers assigned to a student (Delphix Engine, Linux servers, etc.) are accessed using an easy to follow IP scheme: 10.0.studentnumber.suffix. “Studentnumber” is the number the student was given prior to class. Suffix depends on the system; Delphix Engines are at .10, Linux source servers on .20, Linux Targets on .30 and .40, and so on. This makes it so students always get a consistent experience from their labs, every time.
- Lab Guides! This is for Delphix Education, remember? By deploying Lab Guides to these systems, students are able to work through a number of activities right from their jumpbox.
- Carepackages, just like in Hunger Games. LabAlchemy was designed to bring up pre-created labs out of systems saved in Amazon as AMIs. In order to make modifications, add extra features, etc. I designed a system of private/public keys and deployable carepackages, which allow for custom instructions, files, etc. following classroom launch.
- Mobile! Since the LabAlchemy app was created with a mobile friendly graphics library (Twitter Bootstrap 3), and the jumpboxes are displayed with HTML5, you can spin up/tear down classrooms and take labs with an iPad or other tablet. You can do it on a phone too, but man that’s tiny.
That’s it for today! We’ve been using this system internally to provide training, do internal testing, development, and all manner of demos and learning workshops. At its peak we’ve had over 550 servers up at a single time. The best part: on average, the cost of running labs is on average about $0.75 per student per hour. The beauty of the burstable cloud.
Join me next time for more of a deep dive on the technology behind LabAlchemy: python, node.js, guacamole, and more.